In this series I explore scenarios that hurt SQL Server performance and show you how to avoid them. Pulled from my collection of "things I didn't know I was doing wrong for years."
Watch this week's video on YouTube
Last week we discussed how implicit conversions could be one reason why your meticulously designed indexes aren't getting used.
Today let's look at another reason: parameter sniffing.
Here's the key: Parameter sniffing isn't always a bad thing.
Most of the time it's good: it means SQL Server is caching and reusing query plans to make your queries run faster.
Parameter sniffing only becomes a problem when the cached plan isn't anywhere close to being the optimal plan for given input parameters.
So what's parameter sniffing?
Let's start with our table dbo.CoffeeInventory which you can grab from Github.

The key things to know about this table are that:
- We have a nonclustered index on our Name column.
- The data is not distributed evenly (we'll see this in a minute)
Now, let's write a stored procedure that will return a filtered list of coffees in our table, based on the country. Since there is no specific Country column, we'll write it so it filters on the Name column:
DROP PROCEDURE IF EXISTS dbo.FilterCoffee
GO
CREATE PROCEDURE dbo.FilterCoffee
@ParmCountry varchar(30)
AS
BEGIN
    SELECT Name, Price, Description
    FROM Sandbox.dbo.CoffeeInventory
    WHERE Name LIKE @ParmCountry + '%'
END
GO
Let's take a look at parameter sniffing in action, then we'll take a look at why it happens and how to solve it.
EXEC dbo.FilterCoffee @ParmCountry = 'Costa Rica'
EXEC dbo.FilterCoffee @ParmCountry = 'Ethiopia'
Running the above statement gives us identical execution plans using table scans:
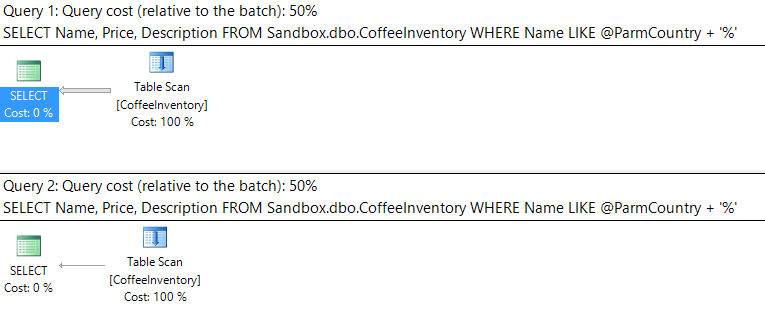
That's weird. We have two query executions, they are using the same plan, and neither plan is using our nonclustered index on Name!
Let's step back and try again. First, clear the query plan cache for this stored procedure:
DECLARE @cache_plan_handle varbinary(44)
SELECT @cache_plan_handle = c.plan_handle
FROM
    sys.dm_exec_cached_plans c
    CROSS APPLY sys.dm_exec_sql_text(c.plan_handle) t
WHERE
    text like 'CREATE%CoffeeInventory%'
-- Never run DBCC FREEPROCCACHE without a parameter in production unless you want to lose all of your cached plans...
DBCC FREEPROCCACHE(@cache_plan_handle)
Next, execute the same stored procedure with the same parameter values, but this time with the 'Ethiopia' parameter value first. Look at the execution plan:
EXEC dbo.FilterCoffee @ParmCountry = 'Ethiopia'
EXEC dbo.FilterCoffee @ParmCountry = 'Costa Rica'
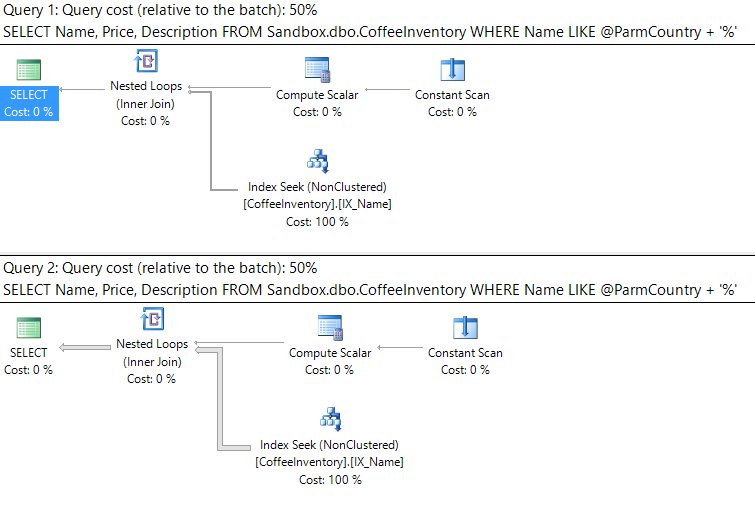
Now our nonclustered index on Name is being utilized. Both queries are still receiving the same (albeit different) plan.
We didn't change anything with our stored procedure code, only the order that we executed the query with different parameters.
What the heck is going on here!?
This is an example of parameter sniffing. The first time a stored procedure (or query) is ran on SQL server, SQL will generate an execution plan for it and store that plan in the query plan cache:
SELECT
    c.usecounts,
    c.cacheobjtype,
    c.objtype,
    c.plan_handle,
    c.size_in_bytes,
    d.name,
    t.text,
    p.query_plan
FROM
    sys.dm_exec_cached_plans c
    CROSS APPLY sys.dm_exec_sql_text(c.plan_handle) t
    CROSS APPLY sys.dm_exec_query_plan(c.plan_handle) p
    INNER JOIN sys.databases d
    ON t.dbid = d.database_id
WHERE
    text like 'CREATE%CoffeeInventory%'

All subsequent executions of that same query will go to the query cache to reuse that same initial query plan — this saves SQL Server time from having to regenerate a new query plan.
Note: A query with different values passed as parameters still counts as the "same query" in the eyes of SQL Server.
In the case of the examples above, the first time the query was executed was with the parameter for "Costa Rica". Remember when I said this dataset was heavily skewed? Let's look at some counts:
SELECT
    LEFT(Name,CHARINDEX(' ',Name)) AS Country,
    COUNT(*) AS CountryCount
FROM dbo.CoffeeInventory
GROUP BY
    LEFT(Name,CHARINDEX(' ',Name))
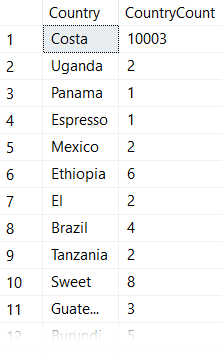
"Costa Rica" has more than 10,000 rows in this table, while all other country names are in the single digits.
This means that when we executed our stored procedure for the first time, SQL Server generated an execution plan that used a table scan because it thought this would be the most efficient way to retrieve 10,003 of the 10,052 rows.
This table scan query plan is only optimal for Costa Rica . Passing in any other country name into the stored procedure would return only a handful of records, making it more efficient for SQL Server to use our nonclustered index.
However, since the Costa Rica plan was the first one to run, and therefore is the one that got added to the query plan cache, all other executions ended up using the same table scan execution plan.
After clearing our cached execution plan using DBCC FREEPROCCACHE, we executed our stored procedure again but with 'Ethiopia' as our parameter. SQL Server determined that a plan with an index seek is optimal to retrieve only 6 of the 10,052 rows in the table. It then cached that Index Seek plan, which is why the second time around the 'Costa Rica' parameter received the execution plan with Index Seek.
Ok, so how do I prevent parameter sniffing?
This question should really be rephrased as "how do I prevent SQL Server from using a sub-optimal plan from the query plan cache?"
Let's take a look at some of the techniques.
1. Use WITH RECOMPILE or OPTION (RECOMPILE)
We can simply add these query hints to either our EXEC statement:
EXEC dbo.FilterCoffee @ParmCountry = 'Ethiopia' WITH RECOMPILE
EXEC dbo.FilterCoffee @ParmCountry = 'Costa Rica' WITH RECOMPILE
or to our stored procedure itself:
DROP PROCEDURE IF EXISTS dbo.FilterCoffee
GO
CREATE PROCEDURE dbo.FilterCoffee
@ParmCountry varchar(30)
AS
BEGIN
    SELECT Name, Price, Description
    FROM Sandbox.dbo.CoffeeInventory
    WHERE Name LIKE @ParmCountry + '%'

    OPTION (RECOMPILE)

END
GO
What the RECOMPILE hint does is force SQL Server to generate a new execution plan every time these queries run.
Using RECOMPILE eliminates our parameter sniffing problem because SQL Server will regenerate the query plan every single time we execute the query.
The disadvantage here is that we lose all benefit from having SQL Server save CPU cycles by caching execution plans.
If your parameter sniffed query is getting ran frequently, RECOMPILE is probably a bad idea because you will encounter a lot of overheard to generate the query plan regularly.
If your parameter sniffed query doesn't get ran often, or if the query doesn't run often enough to stay in the query plan cache anyway, then RECOMPILE is a good solution.
2. Use the OPTIMIZE FOR query hint
Another option we have is to add either one of the following hints to our query. One of these would get added to the same location as OPTION (RECOMPILE) did in the above stored procedure:
OPTION (OPTIMIZE FOR (@ParmCountry UNKNOWN))
or
OPTION (OPTIMIZE FOR (@ParmCountry = 'Ethiopia'))
OPTIMIZE FOR UNKNOWN will use a query plan that's generated from the average distribution stats for that column/index. Often times it results in an average or bad execution plan so I don't like using it.
OPTIMIZE FOR VALUE creates a plan using whatever parameter value specified. This is great if you know your queries will be retrieving data that's optimized for the value you specified most of the time.
In our examples above, if we know the value 'Costa Rica' is rarely queried, we might optimize for index seeks. Most queries will then run the optimal cached query plan and we'll only take a hit when 'Costa Rica' is queried.
3. IF/ELSE
This solution allows for ultimate flexibility. Basically, you create different stored procedures that are optimized for different values. Those stored procedures have their plans cached, and then an IF/ELSE statement determines which procedure to run for a passed in parameter:
DROP PROCEDURE IF EXISTS dbo.FilterCoffee
GO
CREATE PROCEDURE dbo.FilterCoffee
@ParmCountry varchar(30)
AS
BEGIN
    IF @ParmCountry = 'Costa Rica'
    BEGIN
    EXEC dbo.ScanningStoredProcedure @ParmCountry
    END
    ELSE
    BEGIN
    EXEC dbo.SeekingStoredProcedure @ParmCountry
    END
END
GO
This option is more work (How do you determine what the IF condition should be? What happens more data is added to the table over time and the distribution of data changes?) but will give you the best performance if you want your plans to be cached and be optimal for the data getting passed in.
Conclusion
- Parameter sniffing is only bad when your data values are unevenly distributed and cached query plans are not optimal for all values.
- SQL Server caches the query plan that is generated from the first run of a query/stored procedure with whatever parameter values were used during that first run.
- Using the RECOMPILE hint is a good solution when your queries aren't getting ran often or aren't staying in the the query cache most of the time anyway.
- The OPTIMIZE FOR hint is good to use when you can specify a value that will generate a query plan that is efficient for most parameter values and are OK with taking a hit for a sub-optimal plan on infrequently queried values.
- Using complex logic (like IF/ELSE) will give you ultimate flexibility and performance, but will also be the worst for long term maintenance.


