Until recently, my family's 90,000+ photos have been hidden away in the depths of my gaming PC's hard drives. Many of the more recent photos were also scattered across our individual iCloud accounts, making them hard to find and access.
A failing backup drive on my PC (thanks S.M.A.R.T.) motivated me to rethink my photo and video storage solution. I needed something that backed up all my family's photos (including those from our phones) and made it possible for everyone, including my kids, to easily access them.
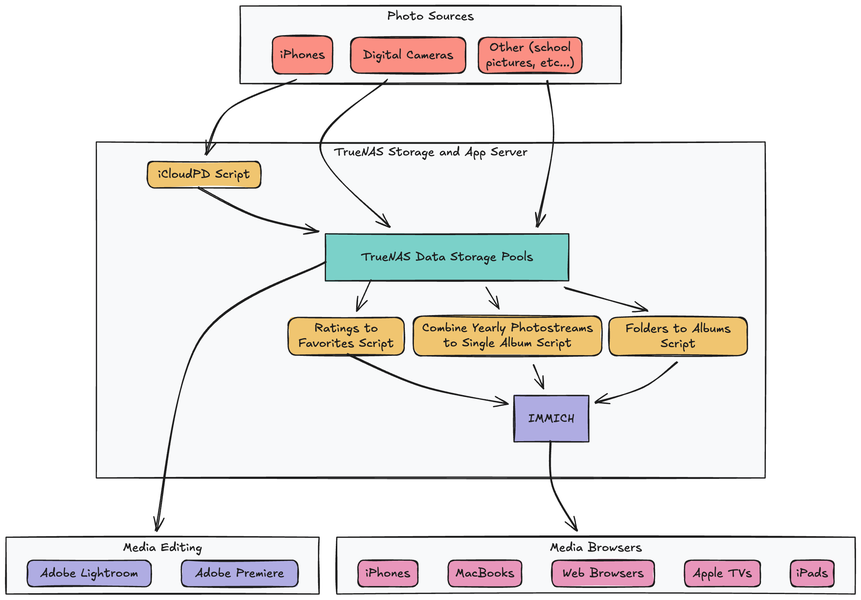
The rest of this post walks through my process of converting my gaming PC to a Network Attached Storage (NAS) server, and the series of software and scripts I use to make my photos easy to access by anyone in my family.
Storage Goals
 The final result of the backed-up and easy to access NAS.
Before diving into the details of how everything is set up, here is what I wanted my new storage solution to achieve:
1. Singular location
I want all my media available in one central place. One "Pictures" folder that has everything. If I want to find a photo, I want to be able to do it within seconds by navigating an organized folder tree structure.
2. File control and ownership
I want complete control over managing the files on disk. I use several pieces of software (more below) that help manage albums, photo edits, metadata, etc... but at the end of the day I want my photos to exist as files on disk and not in some proprietary format or database that is challenging to migrate away from in the future.
3. Ease of use
For the last 8 years, I was the only person in my household who could easily access our photos on my gaming PC. My wife and kids knew I was backing up their photos, but they didn't know where everything was actually stored. This new solution had to be totally accessible and usable by anyone in the family. I want my family to be able to access photos by person, vacation, on a map, or other photo identifying features all from their own devices.
4. Support all devices
Most of our photos nowadays are taken by our phone cameras, except for special events and trips when we use dedicated digital cameras. I want all of these photos, regardless of the device they were taken on, to be searchable and viewable.
5. Backups
All backed up, all the time, without me having to think about it.
6. Lightroom and Premiere
I mainly use Adobe Lightroom for editing my photos. I want to be able to use Lightroom from my MacBook Air, have it run efficiently, and have it access my terabytes of photo data. I also want to be able to edit video projects in Adobe Premiere without storing the video files on my laptop's internal SSD.
The solution outlined in the next sections achieves all these goals.
NAS
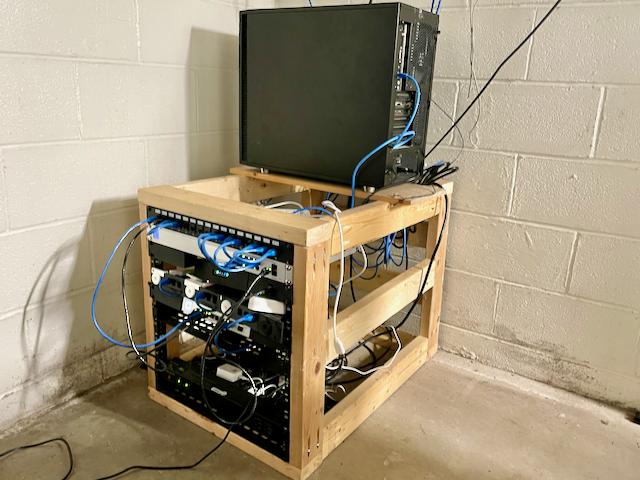 My server rack and cabling isn't winning any awards. But it is functional and made for nearly no cost from many reused parts. The new NAS server, the former gaming PC, sits on top.
The core solution to achieve all the above goals is a NAS server. There are many NAS hardware devices you can buy pre-built, but I decided to reuse as much as I could from my old gaming PC.
I was able to reuse: - 4-core Intel i7-7700K - 32gb of RAM - GeForce GTX 1050 Ti GPU (while underpowered by today's standards of modern gaming and LLM AI, it still works great for the machine learning face recognition I'll be running on it) - .5TB SSD for the NAS operating system - 2TB SSD for Docker apps
The hard drives in the gaming PC were old and starting to fail, so I added four new 4TB hard drives to create the main storage pool.
For the software/operating system, I decided on TrueNAS. I also considered Unraid. I honestly didn't spend a lot of time deciding - it seems like both projects are well maintained. I liked the feel of TrueNAS better, it's performance claims, and it's longer history with ZFS filesystem and snapshots, which led to the decision.
I won't get into the details of configuring TrueNAS here, but I followed this video from Hardware Haven and found it thorough, clear, and easy to follow.
Snapshots and Backups
Once I had my NAS server set up, it took a few ~~days~~ weeks to get all of my data moved. Why that long? I was copying from NTFS drives through Mac (over USB 3.0) over the network to the ZFS drives on the NAS server. I saw there were some faster NTFS drivers on Mac available, but I thought "surely this won't take that long" - well, it did.
The NAS is configured with four 4TB drives in RAID-Z2. This gives me about 7TB of usable storage space, which is roughly four times more than I previously had available. I chose ZFS as the filesystem primarily because of its protections against silent data corruption.
 Look at all that beautiful available capacity.
I'm a believer in the 3-2-1 backup strategy (three copies, two media/devices, one offsite) and that's what I implemented for my server.
My original copy of my data exists on the NAS. While RAID-Z2 does offer some backup protection (two disks can fail and I still don't lose any data), that is mainly a resiliency feature and I don't count it as a true backup, though it is a nice bonus.
I also keep a copy of the data on an 8TB external hard drive. I walk down to the server rack in my basement once per month, plug the external drive in, and backup all the data to it. Once complete, I disconnect the external drive and store it unplugged upstairs in my office. This protects my data from basement flooding, electrical frying, or malware takeovers (with potentially a loss of one month of data since I only sync it once per month).
Finally, I keep another copy synced to the cloud with Backblaze B2. I've used Backblaze's personal product for years, and switching to B2 was a breeze. I highly recommend it, and at the time of writing, it costs about $10/month to backup 2TB of data on the B2 tier(affiliate link if you would like to try it out. For fun, I sync to a B2 region far from where I live so in the (unlikely) event of a regional catastrophe, my data still exists somewhere far away. My offsite cloud backup runs nightly.
NOTE: If you use Backblaze B2, make sure you enable --fast-list to keep your bill lower (the Backblaze docs say it...but I missed it initially).
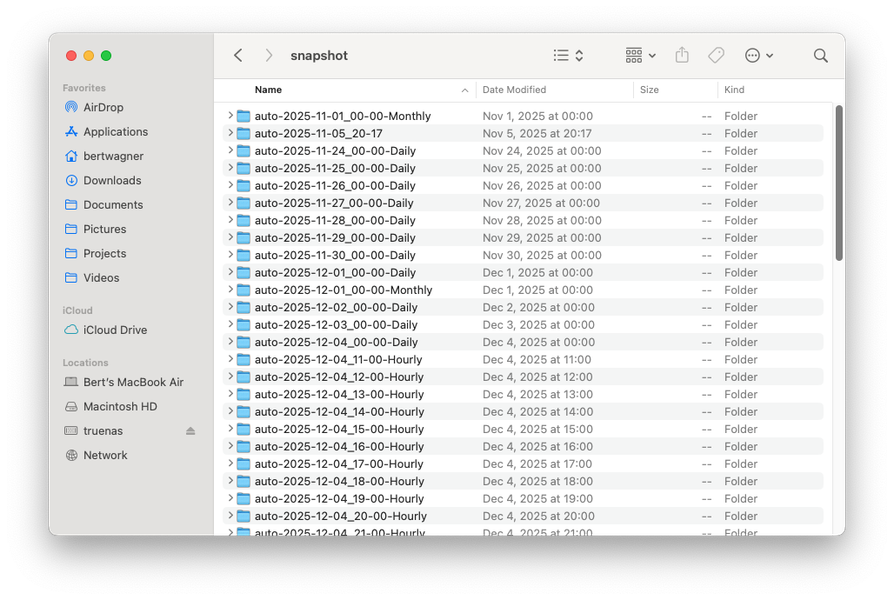
In addition to the nightly backups, I run snapshots every hour, day, and month:
 TrueNAS makes it easy to set up snapshots on any schedule you want.
These are kept for a certain amount of time, allowing me to recover recently deleted files easily. The snapshot files are stored by date in a hidden .zfs/snapshot folder, making it very easy to find an accidentally deleted file:
Organization and Photo Software
Here is the high-level workflow I have automated for backing up and using all of my family's photos:
On Disk
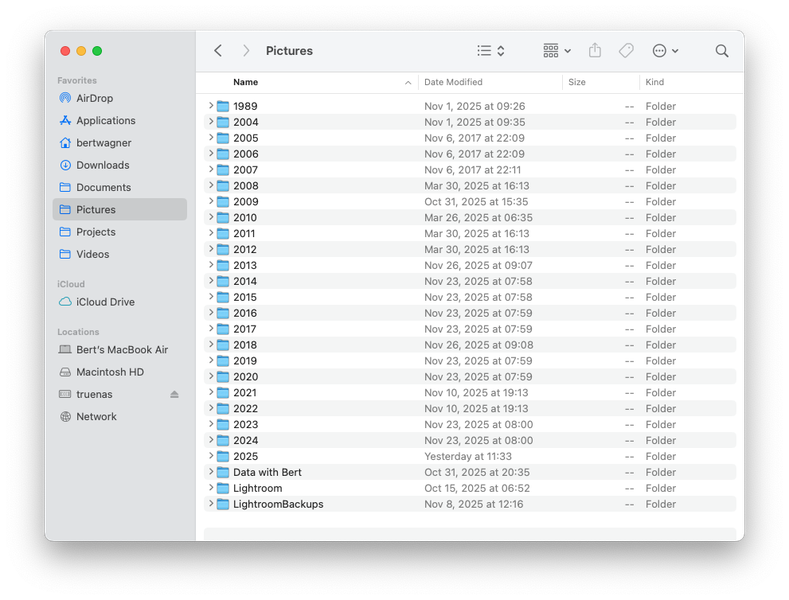
I store all my photos by date:
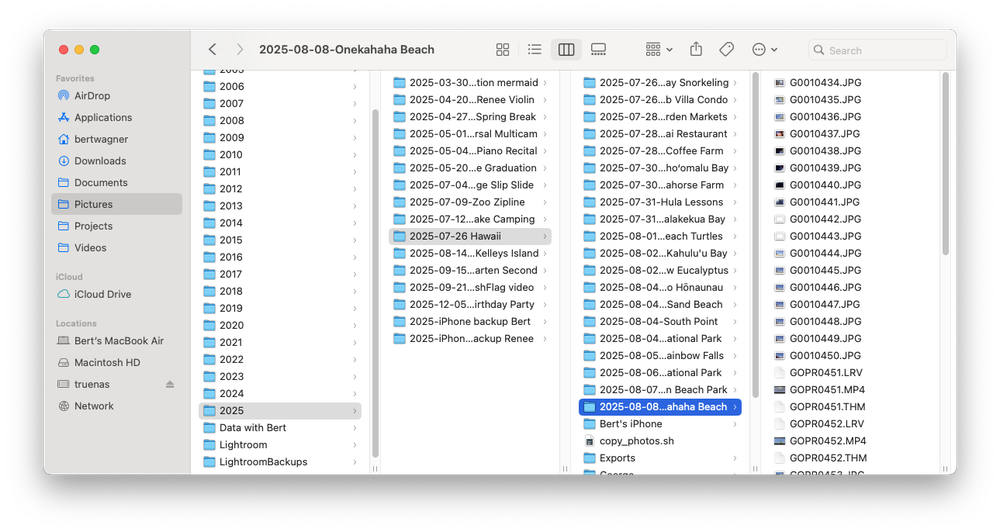 I have a folder for the year, and then a folder with
 YYYY-MM-DD KEYWORDS DESCRIPTION to make it easy to find photos. This system allows me to find any photo I need in about 30 seconds. Professional photographer Scott Kelby argues you should organize by subject, and while I follow a lot of his Lightroom workflow process as outlined in that video, for me it makes more sense for the source files to be organized by date.
With today's machine learning object recognition tools, and the fact that all my cameras capture GPS coordinates of photos, I can easily search my catalogs by person or place too, so finding the media I need is easier than ever before:
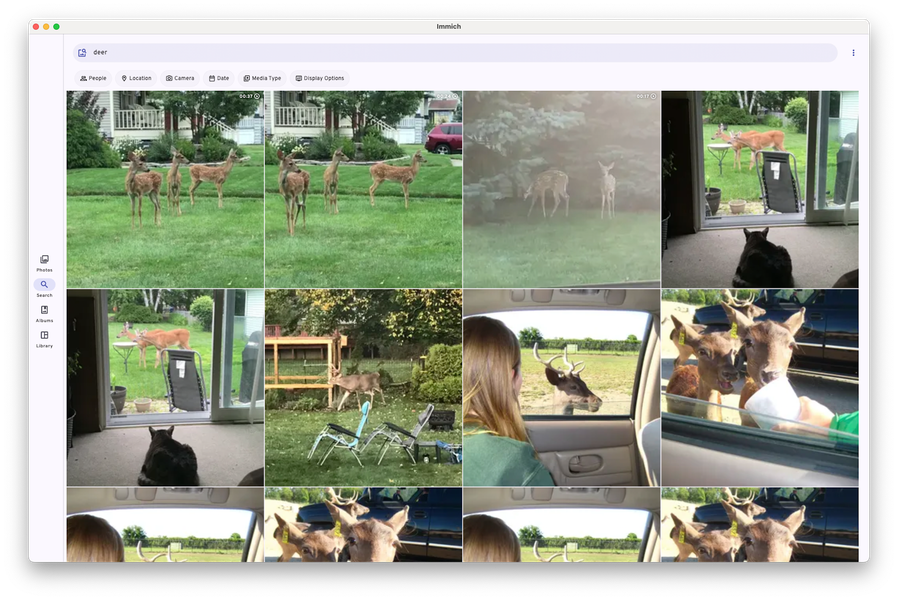 Searching across all albums for "deer" in IMMICH, detailed further below.
iCloud
What about photos that I take with my phone? For me, I like storing one folder per year, eg. 2025/2025-iPhone backup Bert that has a copy of all my year's iPhone photos.
How do I get my photos in there? I have a script that utilizes the icloud photos downloader CLI tool to download my photos from iCloud:
#!/bin/sh

# Read in credential variables
source /icloudpdconfig/.env

# icloudpd options:
# --cookie-directory Persist login cookies to a mounted volume
# --xmp-sidecar Download XMP sidecar files (includes iPhone "Favorite" ratings)
# --smtp-* Email server for notifications
# --directory Where to save the downloaded photos
# --keep-icloud-recent-days Delete iCloud files older than 6 months

icloudpd \
    --cookie-directory /icloudpdconfig/cookies \
    --xmp-sidecar \
    --smtp-host $EMAIL_HOST \
    --smtp-port $EMAIL_PORT \
    --smtp-username $SMTP_USERNAME \
    --smtp-password $SMTP_PASSWORD \
    --username $ICLOUD_EMAIL \
    --password $ICLOUD_PASSWORD \
    --directory /Pictures/ \
    --folder-structure "{:%Y/%Y-iPhone backup Bert}"
    --keep-icloud-recent-days 180
I have this script run hourly and copy my photos from iCloud to my NAS. It also deletes photos older than 6 months old, freeing up space to fit within the 5GB iCloud free tier. I found a free option for still accessing all my phone photos which I outline further below.
In addition to copying the photos from iCloud, it also copies down the meta information into XMP side car files (including photos I've tagged as Favorites on my phone) which will be important later on.
Lightroom
 I use Adobe Lightroom for all of my image editing (and Adobe Premiere for my video editing). As part of this transition to a NAS server, I wanted to ensure my media editing would still be fast and accessible from my primary editing device, a MacBook Air.
In short, it works great. For Lightroom, I keep my Catalog (Lightroom's database of edits and metadata) on my MacBook Air. I then point it to my NAS hosted photos and editing works seamlessly.
I was worried that moving my whole catalog would be hard, but it was as easy as repointing Lightroom to the NAS location, and everything worked.
Although the Lightroom Catalog is stored locally to provide fast performance for editing, I still backup the Catalog to the NAS in case my MacBook Air SSD ever fails.
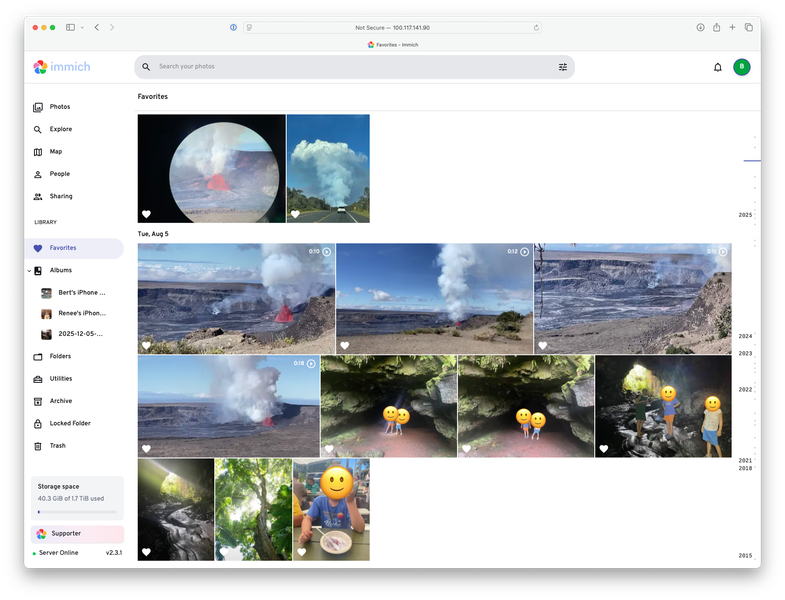
IMMICH
With storage and editing of photos solved, what about accessing those photos easily from any of my devices?
This is where IMMICH, the open-source photo and video browser steps in.
 Although IMMICH has many features, I mainly use it as a self-hosted photo and video browser. Since I have all of my media stored on my NAS (including my photos from iCloud), I configured IMMICH to read my NAS mount as an external library, and now all my photos and videos are easily viewed within the app.
While IMMICH is able to load all my photos from the NAS, I do run a couple extra scripts that make IMMICH even more powerful than the default.
First, I run immich-folder-album-creator to convert all the folders on disk into Albums in IMMICH:
docker run \
  -e API_URL=$API_URL \
  -e API_KEY=$API_KEY \
  -v "/mnt/storage/storage-share/Pictures:/mnt/media/Pictures:ro" \
  -e ROOT_PATH="/mnt/media/Pictures" \
  -e ALBUM_LEVELS="2" \
  -e IGNORE="iPhone backup Bert" \
  -e PATH_FILTER="**/20*/*" \
  -e ALBUM_NAME_POST_REGEX1="'^\d{4} ' ''" \
  -e UNATTENDED="1"  \
  salvoxia/immich-folder-album-creator:latest
This allows me to navigate photos in IMMICH exactly how I do on my computer. This is especially useful when I'm on my phone and need to find a photo from years ago. Even though IMMICH maintains its album information in its proprietary database, this doesn't bother me since it is scripted out and easily recreated.
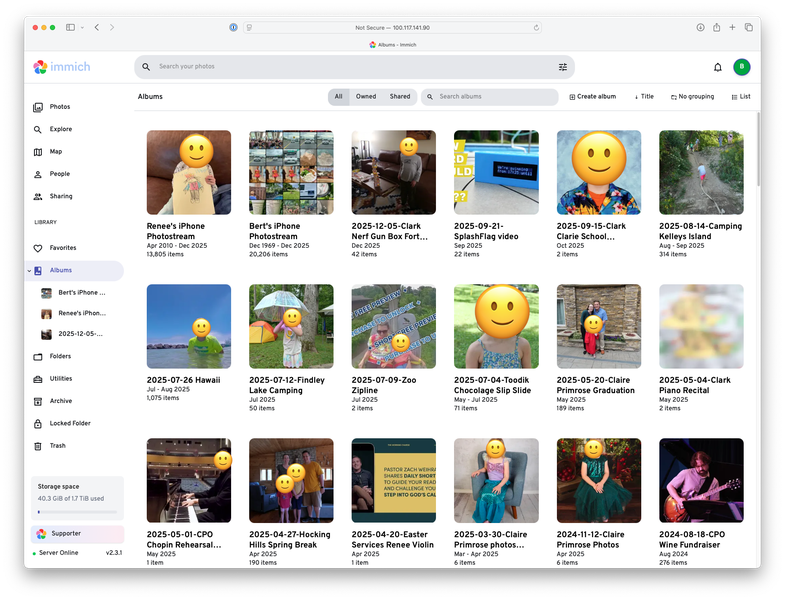 Two albums for our iPhone photostreams, plus the rest of our NAS photo albums organized by date.
I also have this script that combines all of my yearly iPhone backup albums into a single iPhone photostream album:
docker run \
  -e API_URL=$API_URL \
  -e API_KEY=$API_KEY \
  -v "/mnt/storage/storage-share/Pictures:/mnt/media/Pictures:ro" \
  -e ROOT_PATH="/mnt/media/Pictures" \
  -e ALBUM_LEVELS="2" \
  -e PATH_FILTER="*/*-iPhone backup Bert/*" \
  -e ALBUM_NAME_POST_REGEX1="'\d{4} \d{4}-iPhone backup Bert' 'Bert'\''s iPhone Photostream'" \
  -e FIND_ASSETS_IN_ALBUMS="1" \
  -e UNATTENDED="1" \
  salvoxia/immich-folder-album-creator:latest
I run this once for my iPhone albums, and once for my wife's. This gives us an album that mimics iCloud's photostream, containing all photos I've ever taken with my phone in chronological order, within IMMICH. This is what allowed me to cancel my iCloud storage subscription.
Finally, the last step I do is sync the meta data for which photos I favorited in iCloud into IMMICH. iCloud Photo Downloader does download the "Favorite" metadata with the --xmp-sidecar argument. It saves it in the Rating property with a value of 5.
While IMMICH does allow reading in the Rating meta data from the XMP sidecar file, it does not treat it as a "Favorite". Favorites are only designated in the IMMICH database and not in any file or sidecar meta data (at least at the time of this writing).
I vibe coded the this python script to go through and finds all the photos that are Rated 5s and marks them as favorites in IMMICH. It works great, allowing me to easily filter on "Favorites" within IMMICH:
Accessing Photos
I want to be able to access photos from any device, whether I'm home or not. The solution I chose was setting up Tailscale on all my devices. Tailscale is a VPN that allows me to access my home network seamlessly from any device.
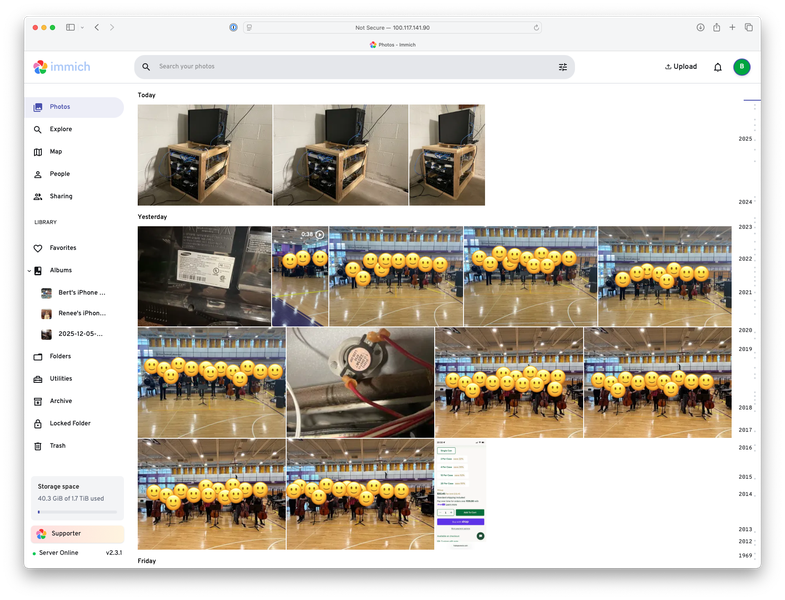
This means after installing Tailscale on my wife's and my phones, our laptops, and our Apple TV (where the kids primarily view our family photos), I was all set. I just load IMMICH's URL in the browser and view my photos from anywhere:
 I can now find any image I want at any time from my phone.
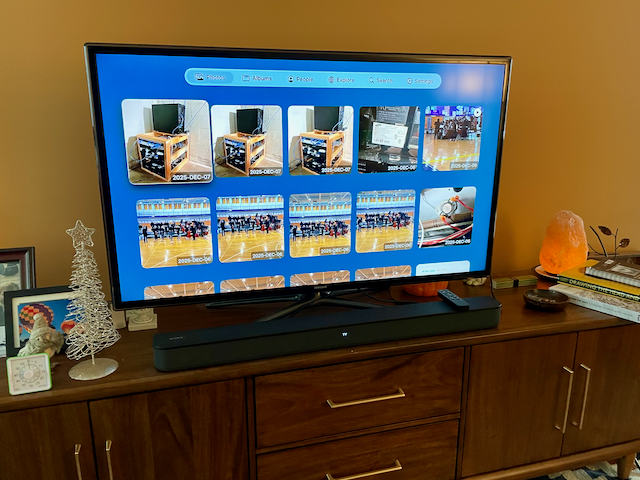 Photo archive available on the Apple TV. Great for sharing photos of trips with family, and easy enough for my kids to use and look through photos.
Conclusion
Final Thoughts
I'm really pleased with how this process turned out.
I now have a server that stores all of my media, has it backed up multiple ways, is resilient, prevents accidental file deletions, and best of all (at least to my family) allows for photos to be accessible from any of our devices.
Additionally, I no longer need to pay for iCloud photo storage, and my kids finally have a way to look at our family photos without needing to ask us.
Future Improvements
While I like the system I've pieced together, there is still room for improvement. For starters, I'd like to figure out a way to share albums outside of my Tailscale network without compromising privacy or security.
I also didn't set up user accounts with any of this, but I could see that as something that will become important as my kids get older and have their own devices to manage. I'll have to figure out how to have them manage their own media while protecting them from accidentally deleting everything on the server. TrueNAS and IMMICH both have lots of options for user creation and permissions, so this will be something I explore down the road.
Bonus Apps
While not photo related, having a home server is nice for the other apps you can install and run. Here are a few of the ones that I've enjoyed running so far in addition to the photo ones related above:
- SplashFlag: Backend for my neighborly pool notification IoT device.
- Pi Hole - A network wide ad blocker. I previously had this running on a Raspberry Pi, but now it makes sense to have it running on the NAS server.
- FreshRSS - I've been hitting feed limits on all my hosted RSS server free accounts, but finally I have my own self-hosted RSS server. I use NetNewsWire to read from my FreshRSS instance from my laptop and phone.
- ChangeDetection.io - Create RSS feeds to monitor changes to websites. Great for websites that don't host RSS feeds, or when I want to check for when a product comes back in stock.
- Actual Budget - Personal finance app.